


[XNA/MG] Voxel Engine - 3 - Camera and drawing in World space
- 6 août 2018
- 3 min de lecture

This time we will start creating our world. We will add a camera and put our sprites in a world space instead of the screen.
First let's remove what we added to the Game1 script :

Now we will need a new class, it will manage our Terrain. Right click on your project in the Solution explorer > Add > Class, and call it "Terrain".

We will do everything in this class. We need to and Draw. These methods will be called and looped by "Game1".
But first, there are some references we need to use :
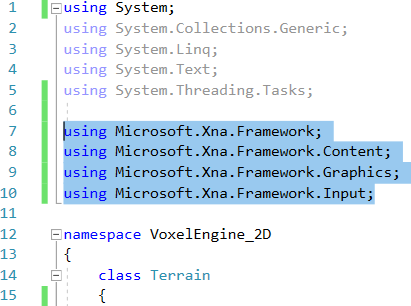
using Microsoft.Xna.Framework;
The main reference will give access to values like "Vector2" and the "Matrix" type, which will be used to build a world space.
using Microsoft.Xna.Framework.Content;
This reference gives access to the Content Manager which will be used to load textures and sounds.
using Microsoft.Xna.Framework.Graphics;
This one gives access to the Graphics system, to draw and get the GraphicsManager used by the game.
using Microsoft.Xna.Framework.Input;
Finally, we need this one to get inputs from the Keyboard and the Mouse. Like keys and mouse positions.
Now let's create some Variables. We need the Camera Position as a Vector2. Then we need a Matrix. It will manage the world space (positions, rotations, ...) but is extremely complex to explain in one or two guides. You can find a post about it here. All we need is how to use them. So we call it "transform". Finally we need a "GraphicsDevice".

Then we need methods. Let's create "Update" and "Draw", and make them public to let "Game1" loop through them.

Now go back to the Game1 class :
When the game starts, we will create a new instance of our terrain/world. To do that, let's create a new variable of type "Terrain" called "newTerrain".

Now let's initialize the terrain. In the "Initialize" method, let's create a new terrain in our null variable.

We will call or methods in this class, to loop through the terrain's methods. Go to Update and Draw. For both, we call the Terrain's methods :


Now go back to the "Terrain" class and let's add some lines in the Update method :

- First, we get each key pressed event, and if a key is pressed, we add/substract a value to the camera position, to make it move on the X and Y axis. That's really basic.
- Then, we move the matrix according to the camera position, we create a translation of the world in a Vector3. The negative values are there because of the coordinates system of MonoGame.
Now we can move the camera in a world view. But there is still nothing on screen.
Go to the "Draw" method :

We loop on the X and Y axes, and at each position we create an image.
Like before, we draw between "Begin" and "End". But this time we have to give the Matrix to "Begin". To do that, we must give other parameters before. These are all the default parameters of an image, but the last one is the matrix. It puts the image in a world space.
We draw the image in a rectangle where the positions are x * 32 and y * 32, to make sure the blocks are next to each other and not pixel by pixel. The size is 32x32 and the color is still white.
Test your project and that's what you should see (You can also move your camera now) :

You can play with your code to give another look to your terrain. We will ad stone under the first layer :


![[XNA/MG] Voxel Engine - 4 - Adding Noise](https://static.wixstatic.com/media/a27d24_33534ec638c345beb6f13916d2777f27~mv2.png/v1/fill/w_752,h_440,al_c,q_85,enc_avif,quality_auto/a27d24_33534ec638c345beb6f13916d2777f27~mv2.png)
![[XNA/MG] Voxel Engine - 2 - First steps and drawing](https://static.wixstatic.com/media/a27d24_67e4f07f9e4340d9b68d215284ba3cd5~mv2.png/v1/fill/w_752,h_440,al_c,q_85,enc_avif,quality_auto/a27d24_67e4f07f9e4340d9b68d215284ba3cd5~mv2.png)
![[XNA/MG] Voxel Engine - 1 - Installing and using MonoGame (XNA)](https://static.wixstatic.com/media/a27d24_359b8a7a5c77478695339b02019dae12~mv2.png/v1/fill/w_752,h_440,al_c,q_85,enc_avif,quality_auto/a27d24_359b8a7a5c77478695339b02019dae12~mv2.png)
Commentaires