


Improved Cube Generation (Cube generation reexplained)
- 9 avr. 2018
- 5 min de lecture
Dernière mise à jour : 10 avr. 2018
(Here i will show you the idea but i won't add it to the course, so you can understand how it works and change it as much as you want before adding it. You can also look at the course to compare and understand.)
The cube generation in Unity can be a bit hard for some developers, there are a lot of things to keep in mind. But there are many ways to improve and make it easier.
The cube is a mesh. A shape containing Vertices, Triangles, UVs, ...
Let's make a cube!
Yes but first, you need quads! (Or faces)
Part 1 - Quads :
A cube is composed of 6 quads :
FRONT, BACK, TOP, BOTTOM, LEFT, RIGHT
But a quad is composed of 2 main parts :

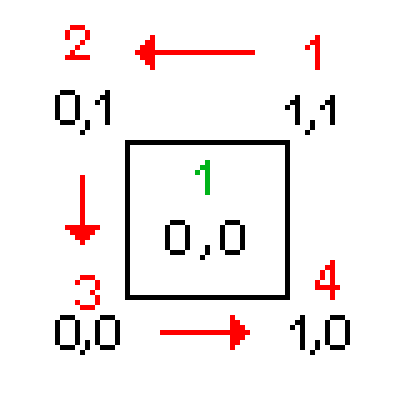
- Vertices : Summits, or corners of the quad. (0,1,2 and 3)
- Triangles : Because a square is 2 triangles (Blue and Green zones)
Meshes in Unity works with triangles only, that's why we need triangles to make a quad.
Also, to make a triangle, we use 3 vertices, here 0,1,2 and 0,2,3. We store them in an array or a list.
Example :
Triangle array = {0,1,2,0,2,3}
Unity will automatically slice the array to have 3 int (0,1,2, 0,2,3). We stored both of the triangles and we have the square.
Remember that 0,1,2 is different than 2,1,0. The order will tell Unity which side of the square will be rendered because a quad is visible from one side only.
We will also add more complex elements to the quads :
- UVs :
UVs are the coordinates of each corner of the texture. It tells the quad how to apply the image.
Usually, their order is
1,1 (Top right),
0,1 (Top left),
0,0 (Down left),
1,0 (Down right).
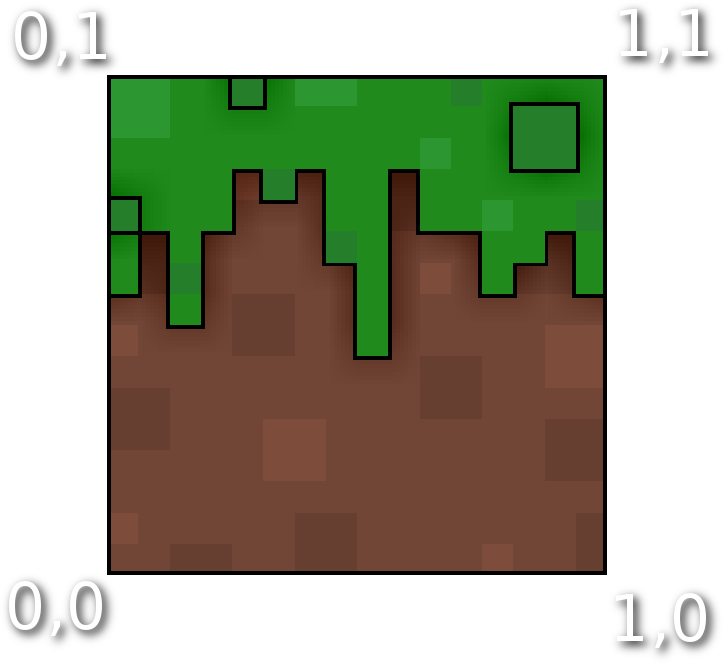
The full texture will we applied to the quad.
It will look like this.
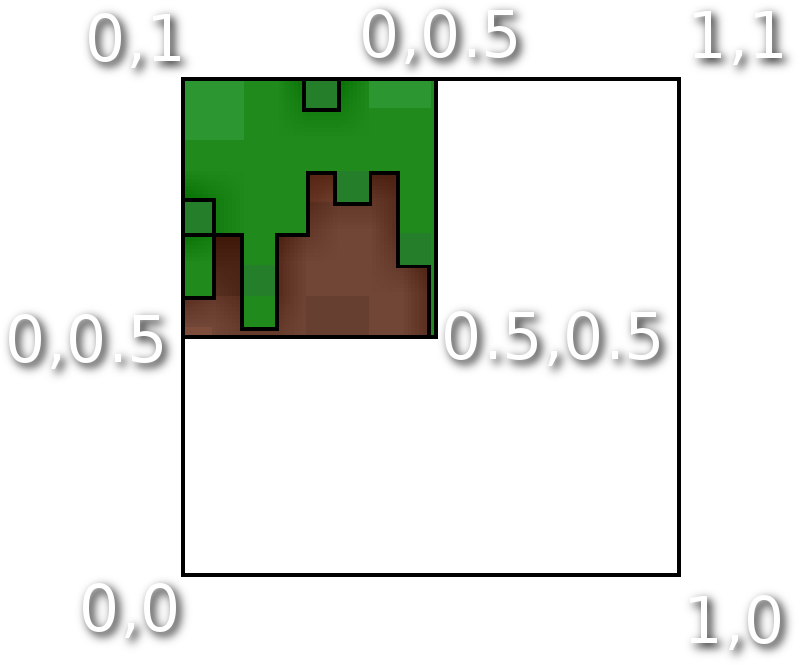
But we can also change the size of the texture applied to the quad by changing the coordinate values.
Here we have (In order) :
0, 0.5 (Top middle),
0, 1 (Top left),
0, 0.5 (Left middle),
0.5, 0.5 (Center).
Those values will be given in an array and Unity will look in it to get the order and the coordinates. That's how they are defined to the quad.
- Normals :

They give the direction of a quad, which way it is facing, so Unity knows how to render the face.
Normals are placed on vertices and are usually given with "Vector3.direction".
They can also be calculated by Unity to avoid adding normals to the code, it is better in a cube. But in a more complex generated mesh, you may want to give them manually.
Now that we have everything we need, we can make the cube.
- To do that, let's create a new C# script called "Cube".
- Create an empty object called "Cube Generator" but don't add the script yet.
Now open the script and we can start coding :

We need two lines above "public class Cube".
- Now you can add the script to the object. Unity will read the script and see that the object requires two components to work. It will add them automatically.
- You can remove the Update method, it won't be used.

We create 3 lists to store the values of the mesh.
Vertices are positions in the world, meaning that they are Vector3.
Triangles are Integers.
UVs are Vector2, they are coordinates in the texture, which is a 2D plane.
Using a list instead of an array is a way to store every value of the cube easily instead of merging every quad array into a single one.
Now we can generate it :

In the Start method, we call another method, "GenerateCube". It will take care of the cube generation. There, you can compare if there is another cube in front of a side or change mesh properties before making the cube.
It starts with "CubeMesh = new Mesh()", which creates an empty mesh to work with and to store our values.
Then, for each side of the cube, it will call the method "CreateCubeSide" and give the name of which side it wants to be created.
In "CreateCubeSide", we ask for a side. Then, we use a switch, it's like a list of possibilities.
So, in the case the variable "side" is equals to "front", we do what is between "case "front"" and "break". Notice that "break" is the end of it and the switch will stop after it is reached.
Every possibility will be between "case possibility :" and "break". It's like and easy a small version of conditions with a lot of "else if".
Now, let's talk about vertices.
We have to give every vertex possible in the cube. Here is the list of them.

Notice that we start from the center of the cube and follow the axis. We add 0.5 or subtract 0.5 to each direction.
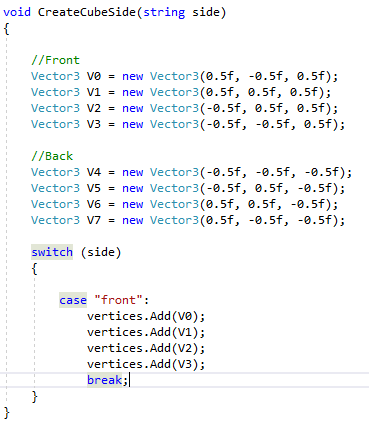
We add every vertex possible to the code as Vector3 before using them for a side of the cube. So only the needed vertices will be used and you won't have to make new ones for each side.
Finally, for the front side, we set which vertices will be used, just like the picture above. The order is important, just like triangles.
But now, we need to set the triangles. There is just a bit more to understand but it's not that hard.
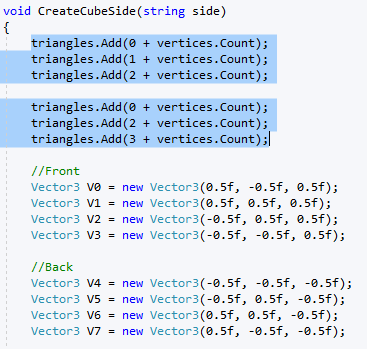
Before creating the vertices, we will set the triangles order. Like i said, this gives to the quad the order to draw both of the triangles. And in which way the side is visible.
We add the new triangles to the list.
(3 + 3 integers)
So we set the order 0,1,2 and 0,2,3, but we add the number of vertices already existing, it tells Unity that we are at the end of the list and we are adding new vertices, so it must use the last values that will be given.
Now, the cube exists in the memory, not physically. There is no need to combine physical quads because they don't exist yet. I optimizes a lot your game.
But we have to make a physical cube, a real one!
And to do that, we will make a new method called "GeneratePhysicalCube", nothing more, nothing less.
Then we can call it after generating all the faces, inside "GenerateCube".


We will put our new values inside the new cube mesh and the new cube mesh inside the object.

First, we keep the MeshFilter component of the object in a variable, to make it easier to access and use.
Then, we put our values we created in the empty cube mesh. We give them as arrays instead of lists, because the mesh only accepts arrays.
We use RecalculateBounds and RecalculateNormals to let Unity recalculate the quads directions and properties.
Finally, we put the cube mesh in the object's MeshFilter. (Remember that the meshfilter is used to give a shape to the object, and the mesh renderer makes it visible).
Now if you test your game, you should see the front of the cube drawn in the scene.

(Notice that the quad is made of two triangles)
The next thing to do is generate the other faces
And don't forget to call them in the "GenerateCube" method!


Now the cube is ready, the last thing to do is add a texture to it :
For now, we will use only one texture, there is no need to have more than one.
To do that, you will need a texture in your project folder, you can use anything you want.
If you drag your texture to the cube, it will give a color, not an image. That's because one pixel of the texture is scaled to the cube's size.
To fix that, we will add UVs to the cube.
And there is only two things to do :
- Set the uv order to the new quad that will be created :

- Add those values to the final mesh :

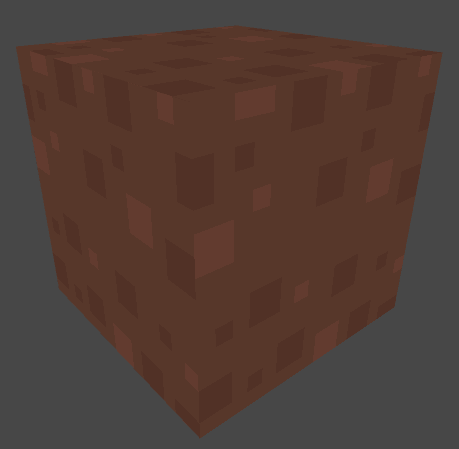
And now you have the final cube with the new and optimized code :
![Voxel Engine V2 [#2] - Game flow](https://static.wixstatic.com/media/a27d24_a0c8df20a5374733af71049c00236947~mv2.png/v1/fill/w_960,h_800,al_c,q_90,enc_avif,quality_auto/a27d24_a0c8df20a5374733af71049c00236947~mv2.png)
![Voxel Engine V2 [#1] - Block Database](https://static.wixstatic.com/media/a27d24_a39edeb9b77f470784a1d117eb277313~mv2.png/v1/fill/w_960,h_800,al_c,q_90,enc_avif,quality_auto/a27d24_a39edeb9b77f470784a1d117eb277313~mv2.png)
![Voxel Engine V2 [#0] - Where to go?](https://static.wixstatic.com/media/a27d24_1f586b591b764f3ebcf8639637b917d5~mv2.png/v1/fill/w_960,h_800,al_c,q_90,enc_avif,quality_auto/a27d24_1f586b591b764f3ebcf8639637b917d5~mv2.png)
Commentaires